When a rate sheet is needed
A rate sheet is needed when your carrier has zone and weight-specific rates and they cannot be tied into Zonos with a carrier account connection. This is often the case if you are using a 3PL. For example, if you are using a 3PL and they use UPS, even though we have a UPS account connection, it won’t work because it is the 3PL’s account and not your own UPS account. If you are not sure if you need a rate sheet, your Zonos onboarding specialist can help you or you can contact support to find out if you need one.
Why a rate sheet is needed
You need a rate sheet when your live shipping rates cannot be pulled in via an API (carrier account connection) so that you are able to charge your customers your negotiated rates. This will help to ensure that you are not overcharging or undercharging the customer and having to absorb the excess fees yourself.
Format your rate sheet
While there is a process to import a rate sheet into Zonos Dashboard, converting your rate sheet to the format that is needed can be complicated, so you’ll typically end up sending your rate sheet to your onboarding specialist or emailing it to contact support with your store ID and name so that they can assist you in getting your rate sheet uploaded and new custom service levels added. See a complete email and rate sheet checklist below.
What to send to Zonos
Before you send in your rate sheet, make sure your onboarding specialist has as much of the following information as possible, which will allow them to get your rate sheet into our system more quickly.
Rate sheet checklist--before you send to Zonos
When requesting a rate sheet from your shipper, please ask them to make sure they include the following:
Ship-to countries formatted as ISO-2 codes, e.g., US, AU, GB, ZA
Zones if needed (only applicable if your rates are set up by zone/groups of countries)
Currency converted to USD (if your shipper can’t do this, let us know)
Weight units in either LB, KG, or OZ
Be sure to include the following in your email when sending your rate sheet to Zonos:
-
Store ID
-
Store name
-
Display name - Let us know what you want to name the new custom service level created from this rate sheet. This is what your customer will see/select at checkout, e.g., International shipping
-
Transit time—optional
- if you want your customer to see an estimated transit time displayed at checkout, include the range of shipping time in calendar days, e.g., 5-7 days, 7-10 days, etc.
-
The shipping provider that gave you these rates
Example of what a rate sheet looks like
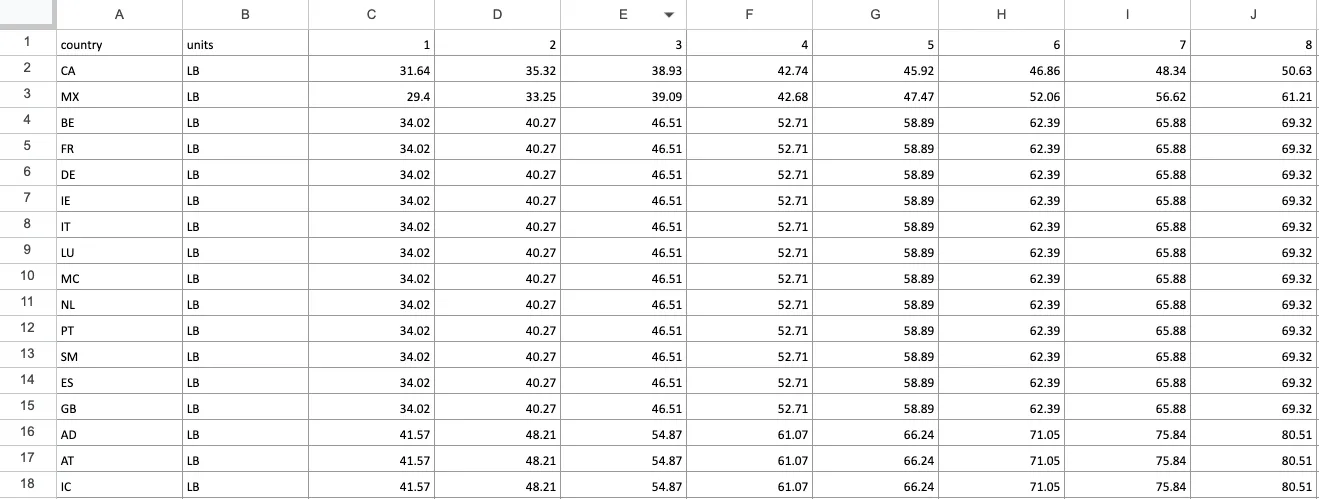
Add a rate sheet
If you have the rate sheet properly formatted, you can follow these steps to assign it to an existing carrier service level in Dashboard:
- Log in to Dashboard.
- In Dashboard, go to Settings -> Shipping -> Rates.
- Click the carrier whose service level requires a rate sheet.
- Click the service level.
- Click Rate options -> Upload rate sheet.
- Click Upload.
Province/state rates in a rate sheet
Rate sheets support province and state-level rate overrides using the optional region column. When a region value is present, that row's rates apply only to shipments going to that specific province or state. Rows without a region value apply to the entire country and serve as the fallback.
Rate sheet format with region
The rate sheet CSV uses the following columns:
| Column↕ | Required↕ | Description↕ |
|---|---|---|
country | Yes | Two-letter ISO country code (e.g., CA, US, GB) |
region | No | Province or state code (e.g., ON, BC, QC, NY). Leave blank for a country-level fallback rate. |
units | Yes | Weight unit: LB or KG |
currency | No | Three-letter currency code (defaults to USD) |
transitMin | No | Minimum transit time |
transitMax | No | Maximum transit time |
transitType | No | DAYS, BUSINESS_DAYS, or WEEKS |
| Weight columns | Yes | Column headers are weight breakpoints (e.g., 1, 2, 5, 10); cell values are the shipping rate for that tier |
Example: Canada with province overrides
country,region,units,currency,transitMin,transitMax,transitType,1,2,5,10,20
CA,,LB,USD,4,8,BUSINESS_DAYS,14.99,17.99,24.99,38.99,61.99
CA,ON,LB,USD,3,6,BUSINESS_DAYS,10.99,13.99,19.99,31.99,52.99
CA,BC,LB,USD,4,7,BUSINESS_DAYS,12.99,15.99,21.99,34.99,55.99
CA,QC,LB,USD,4,8,BUSINESS_DAYS,15.99,18.99,26.99,41.99,65.99
In this example, Ontario (ON), British Columbia (BC), and Quebec (QC) each have their own rates. Any Canadian province not listed (e.g., Alberta, Manitoba) will use the blank-region CA fallback row.
How province rates appear after upload
After uploading a rate sheet with province rows, the rates list groups entries by country. The country-level row is labeled Default; province-specific rows are listed below it (e.g., CA - ON, CA - BC).
You can also manage province rates directly in the UI — see Province/state rate overrides in the flat-rate shipping guide.
Rate sheets
Create a custom service level with a rate sheet.A rate sheet is a spreadsheet provided by your carrier, shipper, or 3PL (third-party logistics company) that Zonos can use to calculate your shipping rates when a carrier account connection is not available or service level calculation for a connected carrier does not return rates via API.
Keep reading to learn when and why rate sheets are required, and what you need to do to create a custom service level in Zonos Dashboard.